Install BSPWM di FreeBSD

JagoTekno.com - BSPWM merupakan salah satu tiling window manager minimalis yang bisa dijadikan alternatif selain DWM. BSPWM selain bisa digunakan di linux, ternyata bisa juga dijalankan di FreeBSD.
Baca : Install BSPWM di Debian Linux
Kali ini saya ingin membagikan tentang cara install BSPWM di FreeBSD. Caranya cukup singkat, jadi kita mulai saja.
Saya masih menggunakan laptop saya Thinkpad X220 untuk tutorila ini jadi, jika kamu menggunakan device yang sama mungkin kita akan mengalami masalah yang sama.
Saya akan menggunakan Polybar sebagai bar dan conky sebagai desktop widget.
Tetapi sayangnya ada fitur dari polybar yang tidak akan berjalan seperti Pulseaudio, wifi, backlight, dan beberapa lainnya.
Install BSPWM, SXHKD dan Polybar
Buka terminal lalu ketik
doas pkg install bspwm sxhkd polybar
Setelah itu edit file .xinitrc kemudian tambahkan baris ini
#!/bin/sh

setxkbmap us &
dbus-launch --exit-with-session bspwm
Membuat konfigurasi BSPWM
Buat sebuah file executable bernama bspwmrc di ~/.config/bspwm/
#! /bin/sh

polybar main &
picom &
xsetroot -cursor_name left_ptr &
set r rate 300 50 &
xset mouse 5 1 &
feh --bg-fill --randomize ~/Pictures/wp/* &
conky -b &
xrdb -merge .Xresources &
copyq &

pgrep -x sxhkd > /dev/null || sxhkd &

bspc monitor -d I II III IV V VI VII VIII IX

bspc config border_width         1
bspc config window_gap           0

bspc config split_ratio          0.52
bspc config borderless_monocle   true
bspc config gapless_monocle      true

bspc config focus_follows_pointer   true
bspc config pointer_follows_focus   true

bspc rule -a Gimp-2.10 desktop='^8' state=floating follow=on
bspc rule -a Firefox desktop='^9'
bspc rule -a mpv state=floating
bspc rule -a Kupfer.py focus=on
bspc rule -a Screenkey manage=off
Untuk membuatnya executable, jangan lupa menjalankan perintah
chmod +x bspwmrc
Membuat konfigurasi SXHKD
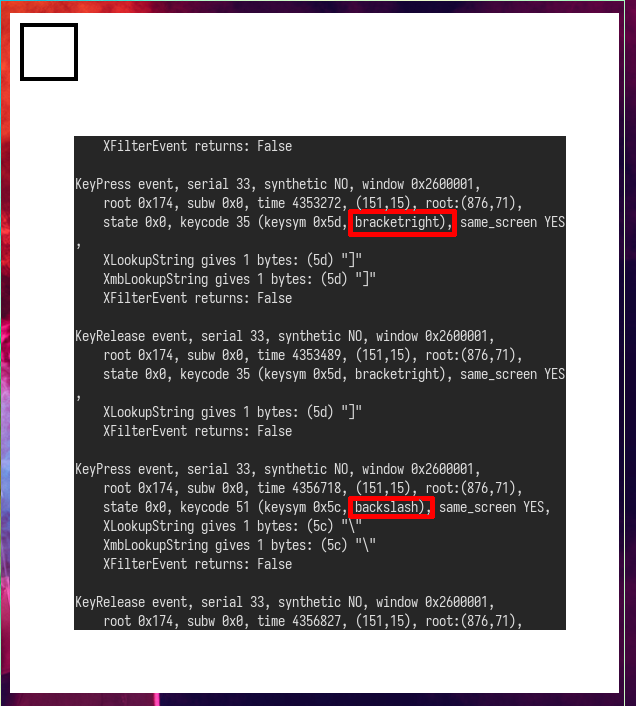
SXHKD merupakan hot key daemon yang berguna untuk menjalankan bspwm melalui input keyboard.
Untuk mengetahui nama input key tertentu gunakan XEV
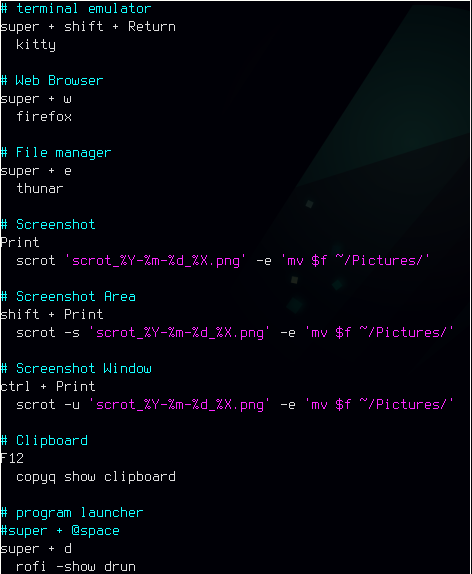
Sama seperti di atas, sekarang kita buat lagi file executable bernama sxhkdrc di ~/.config/sxhkd/
Kemudian isi dengan baris-baris ini:
#
# wm independent hotkeys
#

# terminal emulator
super + shift + Return
	kitty

# program launcher
#super + @space
super + d
	rofi -show drun

# File Manager
super + e
	pcmanfm
super + r
	kitty lf

# Web Browser
super + w
	firefox

# Powermenu
super + q
  ~/.scripts/powermenu.sh

# Select Monitor
super + p
  ~/.scripts/selectmonitor.sh

# Change wallpaper
super + z
  feh --bg-fill --randomize ~/Pictures/wp/* &

# Note Taker
super + n
  kitty -e ~/.scripts/notetaker.sh

# Screenshot
super + F9
  scrot 'scrot_%Y-%m-%d_%X.png' -e 'mv $f ~/Pictures/'

# Screenshot Area
super + shift + F9
  scrot -s 'scrot_%Y-%m-%d_%X.png' -e 'mv $f ~/Pictures/'

# Screenshot Window
super + ctrl + F9
  scrot -u 'scrot_%Y-%m-%d_%X.png' -e 'mv $f ~/Pictures/'

# Clipboard
F12
  copyq show clipboard

# make sxhkd reload its configuration files:
super + Escape
	pkill -USR1 -x sxhkd

#
# Window gaps
#

# Toggle gaps
super + {_,shift + } BackSpace
  bspc config window_gap {0,7}

# Dynamic gaps
super + {minus,equal}
  bspc config -d focused window_gap "$(($(bspc config -d focused window_gap) {-,+} 5 ))"

#
# bspwm hotkeys
#

# quit/restart bspwm
super + alt + {q,r}
	bspc {quit,wm -r}

# close and kill
#super + {_,shift + }c
#	bspc node -{k,c}
super + shift + c
	bspc node -c

# alternate between the tiled and monocle layout
super + m
	bspc desktop -l next

# send the newest marked node to the newest preselected node
super + y
	bspc node newest.marked.local -n newest.!automatic.local

# swap the current node and the biggest window
super + g
	bspc node -s biggest.window

#
# state/flags
#

# set the window state
super + {t,shift + t,s,f}
	bspc node -t {tiled,pseudo_tiled,floating,fullscreen}

# set the node flags
super + ctrl + {m,x,y,z}
	bspc node -g {marked,locked,sticky,private}

#
# focus/swap
#

# focus the node in the given direction
super + {_,shift + }{h,j,k,l}
	bspc node -{f,s} {west,south,north,east}

# focus the node for the given path jump
super + {p,b,comma,period}
	bspc node -f @{parent,brother,first,second}

# focus the next/previous window in the current desktop
super + {_,shift + }u
	bspc node -f {next,prev}.local.!hidden.window

# focus the next/previous desktop in the current monitor
super + bracket{left,right}
	bspc desktop -f {prev,next}.local

# focus the last node/desktop
super + {grave,Tab}
	bspc {node,desktop} -f last

# focus the older or newer node in the focus history
super + {o,i}
	bspc wm -h off; \
	bspc node {older,newer} -f; \
	bspc wm -h on

# focus or send to the given desktop
super + {_,shift + }{1-9,0}
	bspc {desktop -f,node -d} '^{1-9,10}'

#
# preselect
#

# preselect the direction
super + ctrl + {h,j,k,l}
	bspc node -p {west,south,north,east}

# preselect the ratio
super + ctrl + {1-9}
	bspc node -o 0.{1-9}

# cancel the preselection for the focused node
super + ctrl + space
	bspc node -p cancel

# cancel the preselection for the focused desktop
super + ctrl + shift + space
	bspc query -N -d | xargs -I id -n 1 bspc node id -p cancel

#
# move/resize
#

# expand a window by moving one of its side outward
super + alt + {h,j,k,l}
	bspc node -z {left -20 0,bottom 0 20,top 0 -20,right 20 0}

# contract a window by moving one of its side inward
super + alt + shift + {h,j,k,l}
	bspc node -z {right -20 0,top 0 20,bottom 0 -20,left 20 0}

# move a floating window
super + {Left,Down,Up,Right}
	bspc node -v {-20 0,0 20,0 -20,20 0}
Jangan lupa membuat nya menjadi executable dengan perintah ini chmod +x sxhkdrc
Membuat konfigurasi polybar
Untuk menjalankan polybar kita harus membuat file config.ini di ~/.config/polybar/
File config ini tidak perlu executable, tapi langsung saja isi dengan baris-baris berikut :
;==========================================================
;
;
;   ██████╗  ██████╗ ██╗  ██╗   ██╗██████╗  █████╗ ██████╗
;   ██╔══██╗██╔═══██╗██║  ╚██╗ ██╔╝██╔══██╗██╔══██╗██╔══██╗
;   ██████╔╝██║   ██║██║   ╚████╔╝ ██████╔╝███████║██████╔╝
;   ██╔═══╝ ██║   ██║██║    ╚██╔╝  ██╔══██╗██╔══██║██╔══██╗
;   ██║     ╚██████╔╝███████╗██║   ██████╔╝██║  ██║██║  ██║
;   ╚═╝      ╚═════╝ ╚══════╝╚═╝   ╚═════╝ ╚═╝  ╚═╝╚═╝  ╚═╝
;
;
;   To learn more about how to configure Polybar
;   go to https://github.com/polybar/polybar
;
;   The README contains a lot of information
;
;==========================================================

[colors]
background = #282A2E
background-alt = #373B41
foreground = #C5C8C6
primary = #F0C674
secondary = #8ABEB7
alert = #A54242
disabled = #707880

[bar/main]
width = 100%
height = 24pt
radius = 0

; dpi = 96

background = ${colors.background}
foreground = ${colors.foreground}

line-size = 3pt

border-size = 0pt
border-color = #00000000

padding-left = 1
padding-right = 1

module-margin = 1

separator = |
separator-foreground = ${colors.disabled}

font-0 = "Liberation Sans:style=Regular:size=10;2"
font-1 = "FontAwesome:style=Regular:size=10;2"

modules-left = date xwindow
modules-center = xworkspaces
modules-right =

cursor-click = pointer
cursor-scroll = ns-resize

enable-ipc = true

tray-position = right

; wm-restack = generic
 wm-restack = bspwm
; wm-restack =i3

; override-redirect = true

[module/xworkspaces]
type = internal/xworkspaces

label-active = %index%
label-active-background = ${colors.background-alt}
label-active-underline= ${colors.primary}
label-active-padding = 2

label-occupied = %index%
label-occupied-padding = 2

label-urgent = %index%
label-urgent-background = ${colors.alert}
label-urgent-padding = 2

;label-empty = %index%
label-empty =
label-empty-foreground = ${colors.disabled}
label-empty-padding = 2

[module/xwindow]
type = internal/xwindow
label = %title:0:60:...%

[module/filesystem]
type = internal/fs
interval = 25

mount-0 = /

label-mounted = %{F#F0C674}%mountpoint%%{F-} %percentage_used%%

label-unmounted = %mountpoint% not mounted
label-unmounted-foreground = ${colors.disabled}

[module/pulseaudio]
type = internal/pulseaudio

format-volume-prefix = "VOL "
format-volume-prefix-foreground = ${colors.primary}
format-volume = <label-volume>

label-volume = %percentage%%

label-muted = muted
label-muted-foreground = ${colors.disabled}

[module/xkeyboard]
type = internal/xkeyboard
blacklist-0 = num lock

label-layout = %layout%
label-layout-foreground = ${colors.primary}

label-indicator-padding = 2
label-indicator-margin = 1
label-indicator-foreground = ${colors.background}
label-indicator-background = ${colors.secondary}

[module/memory]
type = internal/memory
interval = 2
format-prefix = "RAM "
format-prefix-foreground = ${colors.primary}
label = %percentage_used:2%%

[module/cpu]
type = internal/cpu
interval = 2
format-prefix = "CPU "
format-prefix-foreground = ${colors.primary}
label = %percentage:2%%

[network-base]
type = internal/network
interval = 5
format-connected = <label-connected>
format-disconnected = <label-disconnected>
label-disconnected = %{F#F0C674}%ifname%%{F#707880} disconnected

[module/wlan]
inherit = network-base
interface-type = wireless
label-connected = %{F#F0C674}%ifname%%{F-} %essid% %local_ip%

[module/eth]
inherit = network-base
interface-type = wired
label-connected = %{F#F0C674}%ifname%%{F-} %local_ip%

[module/date]
type = internal/date
interval = 1

date = %H:%M
;date-alt = %Y-%m-%d %H:%M:%S
date-alt = %A, %d %B %Y

label = %date%
label-foreground = ${colors.primary}

[settings]
screenchange-reload = true
pseudo-transparency = true

; vim:ft=dosini
Untuk mempercantik animasinya, jangan lupa gunakan konfigurasi Picom yang keren. Sehingga bisa juga mengaktifkan efek transparansi, border radius pada masing-masing window.
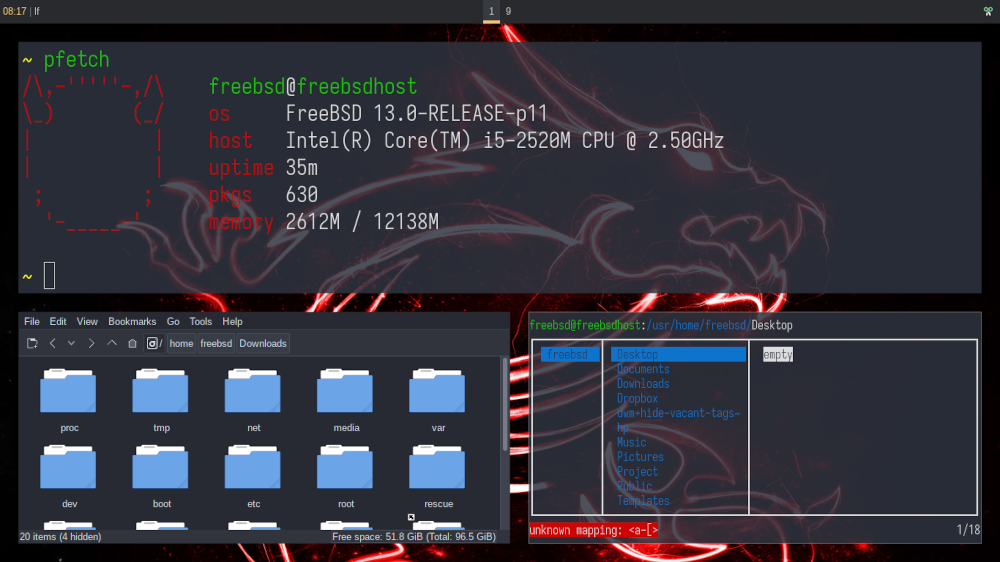
Kekurangan BSPWM di FreeBSD
Fitur BSPWM jika dijalankan bersama Polybar ternyata tidak bisa dirasakan secara sempurna di FreeBSD, karena modul polybar tidak kompatible dengan FreeBSD.
Tapi saya cukup merasakan sistem yang minimalis dengan konfigurasi window manager ini.
Baca juga konfigurasi DWM saya.
Akhir kata
Demikian tutorial singkat tentang cara install dan konfigurasi BSPWM di FreeBSD.
Semoga bermanfaat.
Rafi
- 15 year+ of Linux user.
- 5 years+ blogger and web developer.
Jika artikel yang dibuatnya ternyata bermanfaat, support dengan cara