Menjalankan dan Membuat Konfigurasi Conky Sendiri

JagoTekno.com - Conky adalah software yang akan menampilkan semacam widget pada desktop Linux / Unix anda.
Ini bisa anda gunakan jika ingin mendapatkan lebih banyak informasi system. Atau bagi anda yang tidak ingin menampilkan banyak informasi pada Status DWM (SLStatus, DWMBlocks, dll).
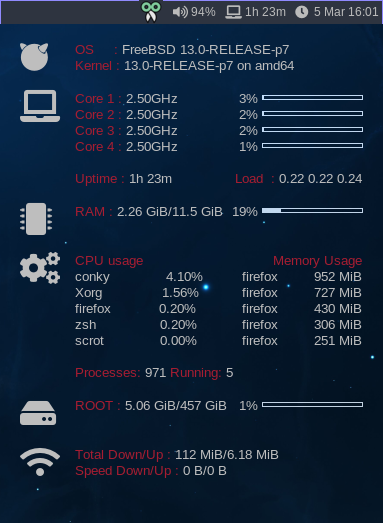
Tampilannya kira-kira seperti ini di desktop.
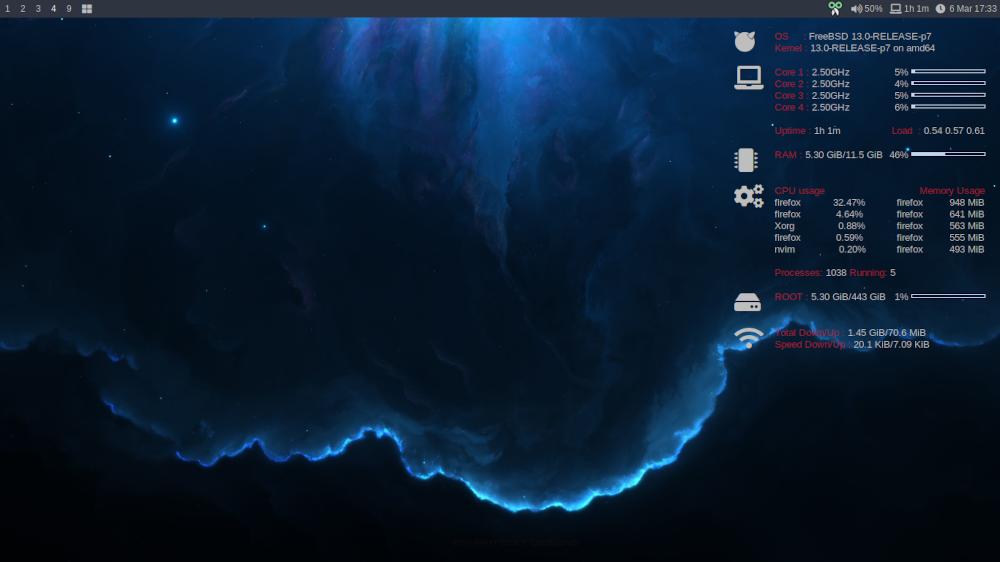
Widget conky ini hanya akan menampilkan informasi saja, anda tidak bisa mengklik apapun di sana.
Cara install Conky
doas pkg install conky
Menjalankan Conky
Setelah diinstall jalankan conky dengan perintah :
conky -b
Untuk membuat conky auto start saat system booting, simpan perintah di atas pada file [.xinitrc](https://jagotekno.com/setting-xinitrc-startx-linux/) anda.
Pengaturan Theme Conky
Pengaturan conky bisa dimulai dengan mengedit file config yang terdapat pada ~/.config/conky/conky.conf
Menjalankan Conky di DWM
Jika anda menjalankan Conky dengan DWM pastikan anda menggunakan override pada pengaturan file conky.conf anda.
own_window_type = 'override',
Selengkapnya seperti ini :
-- Conky, a system monitor https://github.com/brndnmtthws/conky
--
-- This configuration file is Lua code. You can write code in here, and it will
-- execute when Conky loads. You can use it to generate your own advanced
-- configurations.
--
-- Try this (remove the `--`):
--
-- print("Loading Conky config")
--
-- For more on Lua, see:
-- https://www.lua.org/pil/contents.html
conky.config = {
alignment = 'top_right',
background = false,
border_width = 1,
cpu_avg_samples = 2,
color1 = '#a71d31',
color2 = 'gray',
default_color = 'gray',
default_outline_color = 'yellow',
default_shade_color = 'white',
draw_borders = false,
draw_graph_borders = true,
draw_outline = false,
draw_shades = false,
use_xft = true,
font = 'Liberation Sans:size=10',
gap_x = 20,
gap_y = 40,
minimum_height = 5,
minimum_width = 5,
net_avg_samples = 2,
no_buffers = true,
out_to_console = false,
out_to_stderr = false,
extra_newline = false,
own_window = true,
own_window_class = 'Conky',
own_window_type = 'override',
own_window_argb_visual = true,
own_window_argb_value = 0,
stippled_borders = 0,
update_interval = 1.0,
uppercase = false,
use_spacer = 'none',
show_graph_scale = false,
show_graph_range = false
}
conky.text = [[
## OS
${color2}${font Font Awesome 5 Brands Regular:size=24} ${font} ${color1}${goto 60}${voffset -15}OS : ${color}${execi 86400 cat `ls -atr /etc/*-release | tail -2` | grep "PRETTY_NAME" | cut -d= -f2 | sed 's/"//g'}
${color1}${goto 60}Kernel : ${color}$kernel on $machine
## CPU
${color2}${font Font Awesome 5 Free Solid:size=24} ${font} ${color1}${goto 60}${voffset -15}Core 1 : ${color}${freq_g 1}GHz ${alignr}${cpu cpu0}% ${cpubar cpu0 4,100}
${color1}${goto 60}Core 2 : ${color}${freq_g 2}GHz ${alignr}${cpu cpu1}% ${cpubar cpu1 4,100}
${color1}${goto 60}Core 3 : ${color}${freq_g 3}GHz ${alignr}${cpu cpu2}% ${cpubar cpu2 4,100}
${color1}${goto 60}Core 4 : ${color}${freq_g 4}GHz ${alignr}${cpu cpu3}% ${cpubar cpu3 4,100}
${color1}${goto 60}Uptime : ${color}$uptime_short ${alignr}${color1}Load : ${color}${loadavg}
## RAM
${color2}${font Font Awesome 5 Free Solid:size=24}${font} ${color1}${goto 60}${voffset -15}RAM : ${color}$mem/$memmax ${alignr}$memperc% ${membar 4,100}
## Process
${color2}${font Font Awesome 5 Free Solid:size=24}${font}${color1}${goto 60}${voffset -15}CPU usage ${alignr}Memory Usage${color}
${goto 60}${top name 1} ${color}${top cpu 1}% ${alignr}${top_mem name 1}${top_mem mem_res 1}
${goto 60}${top name 2} ${color}${top cpu 2}% ${alignr}${top_mem name 2}${top_mem mem_res 2}
${goto 60}${top name 3} ${color}${top cpu 3}% ${alignr}${top_mem name 3}${top_mem mem_res 3}
${goto 60}${top name 4} ${color}${top cpu 4}% ${alignr}${top_mem name 4}${top_mem mem_res 4}
${goto 60}${top name 5} ${color}${top cpu 5}% ${alignr}${top_mem name 5}${top_mem mem_res 5}
${color1}${goto 60}Processes: ${color}$processes ${color1}Running: ${color}$running_processes
## STORAGE
${color2}${font Font Awesome 5 Free Solid:size=24}${font} ${color1}${voffset -15}${goto 60}ROOT : ${color}${fs_used /}/${fs_size /} ${alignr}${fs_used_perc /}% ${fs_bar 4,100 /}
## WIFI
${color2}${font Font Awesome 5 Free Solid:size=24} ${font} ${color1}${voffset -15}${goto 60}Total Down/Up : ${color}${totaldown wlan0}/${totalup wlan0}
${color1}${goto 60}Speed Down/Up : ${color}${downspeed wlan0}/${upspeed wlan0}
]]
Maka anda akan mendapatkan tampilan yang sama dengan gambar di atas.
Catatan :
Jangan lupa menginstall font yang dibutuhkan :
- Font Awesome untuk menampilkan icon pada setting conky ini.
Silahkan diexplore.
Rafi
- 15 year+ of Linux user.
- 5 years+ blogger and web developer.
Jika artikel yang dibuatnya ternyata bermanfaat, support dengan cara